 Pin It
 My first hojicha cheesecake happened by accident, really. I was standing in a Japanese tea shop on a rainy afternoon, holding a cup of hojicha, when the roasted aroma hit me differently than usual—suddenly I could imagine it swirled into something creamy and indulgent. The shop owner smiled knowingly when I asked if anyone had tried that before. A few weeks later, my kitchen smelled like toasted tea leaves and butter, and I realized I'd stumbled onto something quietly magical.
I made this for a small dinner party once, nervous about whether people would actually enjoy something so unconventional. But watching my friend take that first bite, eyes widening as the hojicha notes unfolded on her tongue—that's when I knew this recipe had crossed over from experiment into something worth keeping. She asked for seconds before anyone else had finished their first slice.
Ingredients
- Graham cracker crumbs: Toast them slightly if yours taste a bit bland, and pack them down really firmly so your crust doesn't crumble when you slice.
- Unsalted butter: Melted and warm helps the crumbs bind together like they're meant to be, creating that perfect snap when you bite through.
- Hojicha loose leaf tea: Buy quality hojicha if you can—the roast level matters more than you'd think, and it's the star here, so don't skimp.
- Heavy cream: The steeping liquid that carries all that toasted flavor into your filling, so use the real thing.
- Cream cheese: Room temperature is non-negotiable; cold cream cheese creates lumps that no amount of beating will smooth out.
- Sour cream: This adds tanginess that balances the richness and keeps the hojicha from tasting cloying.
- Eggs: Add them one at a time and actually mix between each addition—this prevents overmixing and keeps your cake tender.
Tired of Takeout? 🥡
Get 10 meals you can make faster than delivery arrives. Seriously.
One email. No spam. Unsubscribe anytime.
Instructions
- Set your stage:
- Preheat to 160°C and line your springform pan with parchment on the bottom—this prevents any leaks and makes removal easier later. Having everything ready before you start is the difference between a calm bake and a frantic one.
- Build your crust:
- Mix the crumbs with melted butter, sugar, and salt until it looks like wet sand, then press it firmly and evenly into the pan with the bottom of a measuring cup. Bake for 10 minutes until it smells nutty and golden, then let it cool completely.
- Brew the hojicha magic:
- Heat cream until it just steams (not a rolling boil), pour it over your hojicha tea, cover it, and let it sit for 10 minutes while the whole kitchen fills with that toasty aroma. Strain out every last leaf and let it cool to room temperature—this step cannot be rushed.
- Create your filling base:
- Beat softened cream cheese until it's smooth and there are no lumps hiding anywhere, then add sugar gradually while mixing. Add eggs one at a time, beating between each addition, then fold in sour cream, vanilla, and flour until just combined—overmixing introduces air bubbles that crack when baking.
- Make the swirl happen:
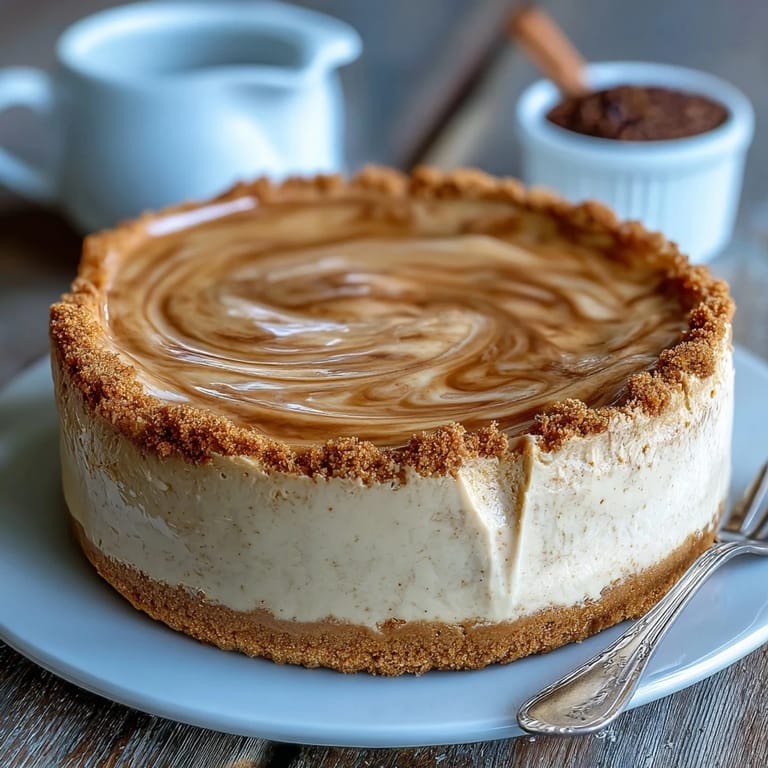
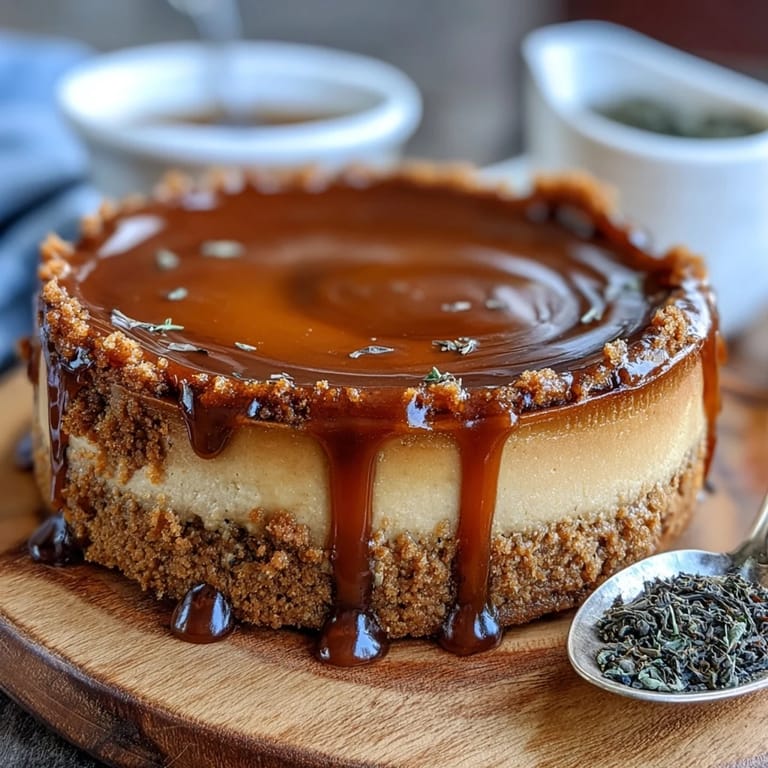
- Divide about a third cup of plain batter into a small bowl and stir in your cooled hojicha cream until it's evenly colored and smooth. This concentration of flavor will create those beautiful ribbons of roasted tea throughout.
- Marble with intention:
- Pour the plain batter over your cooled crust, then drop spoonfuls of hojicha batter across the top in a pattern you like. Use a skewer or thin knife to draw through the batters in gentle waves—less is more here, as aggressive swirling muddles the colors.
- Bake with patience:
- Place the pan on a baking tray and bake for 40 to 45 minutes until the edges look set but the center jiggles slightly when you shake the pan gently. The center will continue cooking as it cools, so don't overbake or you'll end up with a dense, cracked cake.
- Cool slowly and mindfully:
- Turn off the oven and crack the door open about two inches, letting the cheesecake cool inside for a full hour—this gradual temperature change prevents the dreaded cracks. The patience here is what transforms a good cheesecake into a silky one.
- Finish with rest:
- Cool to room temperature at your counter, then cover and refrigerate for at least five hours, though overnight is truly better. This resting time lets the flavors settle and the texture become perfectly creamy.
 Pin It
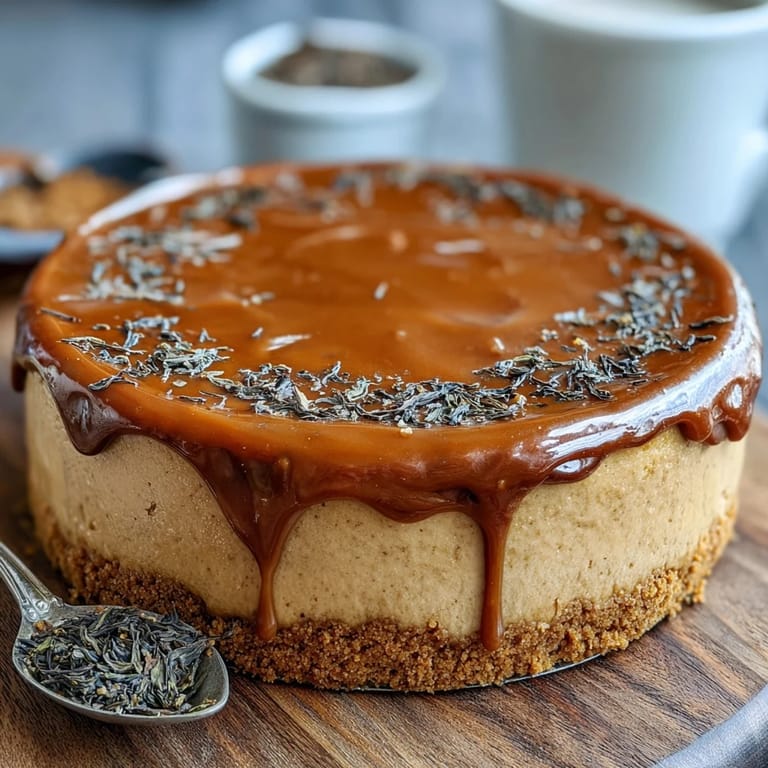
 There's something almost meditative about hojicha cheesecake—the way the kitchen fills with that roasted tea smell, the gentle swirling motion, the long wait for it to cool. It taught me that sometimes the best desserts aren't about fancy techniques but about respecting each ingredient and giving the process room to breathe.
The Art of the Hojicha Steep
Hojicha is already roasted before you buy it, which means you're not extracting caffeine so much as drawing out that warm, almost nutty character. The difference between a 10-minute steep and a 15-minute steep can shift the whole flavor profile—go too long and it tastes slightly burnt, not long enough and it whispers instead of speaks. I learned this the hard way during my second attempt, when I thought more time would equal more flavor, and instead ended up with something tasting almost smoky. Now I set a timer and actually listen for when the cream stops steaming.
Timing and Temperature Matter More Than You Think
The low oven temperature of 160°C feels slow, but it's actually the secret to a creamy interior without a rubbery edge. Most ovens run hotter than they claim, so if you have an oven thermometer, use it—this single tool has rescued more than one cheesecake in my house. I also learned to position my pan on the middle rack and to open the oven door as minimally as possible, because every time you peek, you're letting heat escape and extending the bake unpredictably.
Customizing Your Swirl
The beauty of this cheesecake is how forgiving the marbling actually is once you stop worrying about making it look restaurant-perfect. I've done delicate swirls, bold strokes, and random dollops, and honestly, they all taste equally delicious—the visual appeal is just a bonus. Some home cooks dust the finished cake with hojicha powder or add a dollop of whipped cream, which both look elegant and taste like the perfect final touch.
- Keep hojicha powder in an airtight container and dust it on just before serving so it doesn't absorb moisture and clump.
- If you want to pipe whipped cream on top, make it right before serving and keep it cold until the last moment.
- A thin sharp knife dipped in hot water and wiped clean between slices gives you the cleanest cuts and shows off that beautiful marbling.
 Pin It
 This cheesecake reminds me that food can bridge cultures and palates, and that sometimes the most memorable dishes come from simply asking what if. Make this when you want to impress someone, but mostly make it because it brings you joy.
Recipe FAQs
- → What does hojicha taste like in cheesecake?
Hojicha adds warm, nutty, and caramel-like notes to the creamy filling. The roasted green tea provides subtle earthiness that complements the rich cream cheese without overpowering it.
- → Can I use matcha instead of hojicha?
While possible, matcha has a grassier, more bitter profile than hojicha. The roasted nature of hojicha creates a mellower, warmer flavor that pairs exceptionally well with dairy.
- → Why does the cheesecake need 7 hours total time?
After baking, the cheesecake must cool gradually in the oven for 1 hour to prevent cracking. Then it requires at least 5 hours of refrigeration to set properly and develop the ideal creamy texture.
- → What's the purpose of the flour in the filling?
One tablespoon of flour helps stabilize the structure, preventing excessive cracking while maintaining a velvety smooth consistency. It's a common technique in traditional cheesecake making.
- → Can I make this without a springform pan?
A springform pan is ideal for easy removal without damaging the crust. However, a regular cake pan lined with parchment paper hanging over the sides can work as an alternative.
- → How do I know when the cheesecake is done baking?
The edges should appear set and slightly puffed, while the center remains slightly jiggly like gelatin. This residual heat completes the cooking as it cools.